Merlin - She's WET!!!

Re: Merlin - Pin Stripe Added 7-18-10
Thanks guys. I've been here all along, just quitely admiring Dogpaddlin's work. That is going to be a beatiful rig when finished. Keep up the excellent work!
-
Dogpaddlin
- Posts: 874
- Joined: Tue Sep 18, 2007 5:34 pm
- Location: Round Rock
Re: Merlin - Pin Stripe Filled 8-17-10
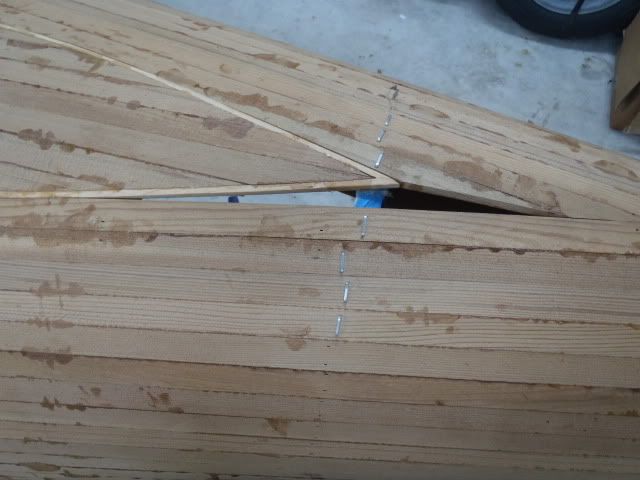
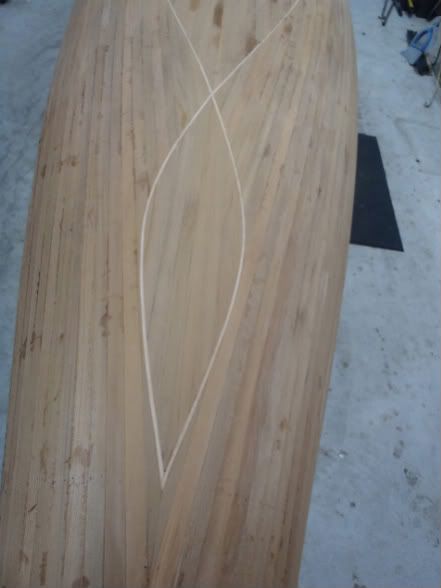
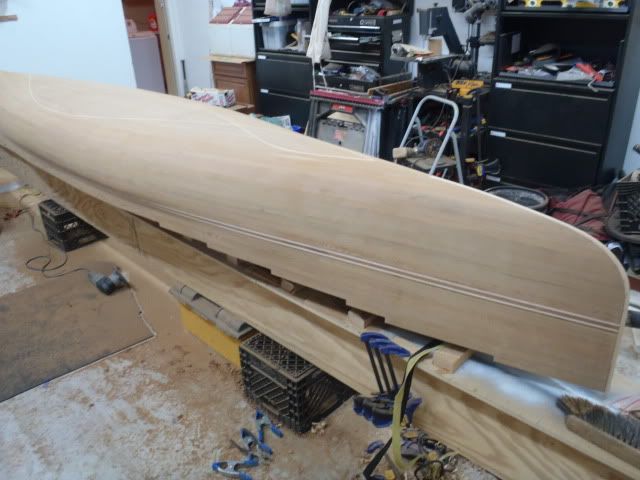
I just finished filling the pin stripe. Just 72 more strips and I will be done (with this phase anyway  ) and yes, I counted.
-
bowgarguide

- TKF 5000 Club

- Posts: 5370
- Joined: Mon Jan 15, 2007 7:52 pm
Re: Merlin - Pin Stripe Filled 8-17-10
Looking good Toby.
Ron
Ron
-
gerald

- TKF 4000 Club

- Posts: 4174
- Joined: Thu Jun 12, 2003 10:48 am
- Location: Gatesville, tx www.theoldmansboats.com
Re: Merlin - Pin Stripe Filled 8-17-10
Ah yes...very nice.

Re: Merlin - Pin Stripe Filled 8-17-10
I hope I can do half that nice someday. ET 
-
Dogpaddlin
- Posts: 874
- Joined: Tue Sep 18, 2007 5:34 pm
- Location: Round Rock
Re: Merlin - Last Strip Installed!!! 9-20-10
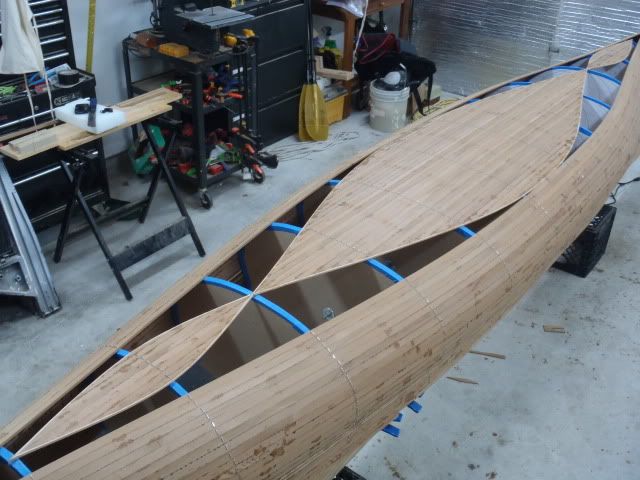
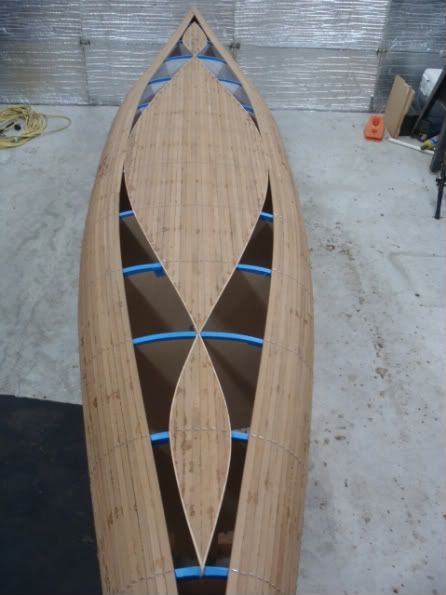
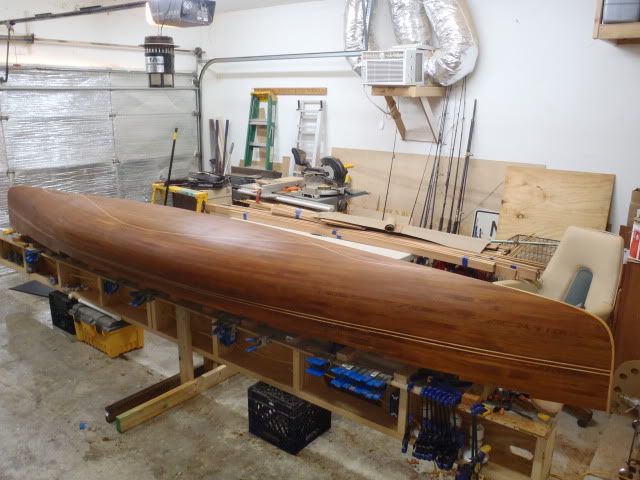
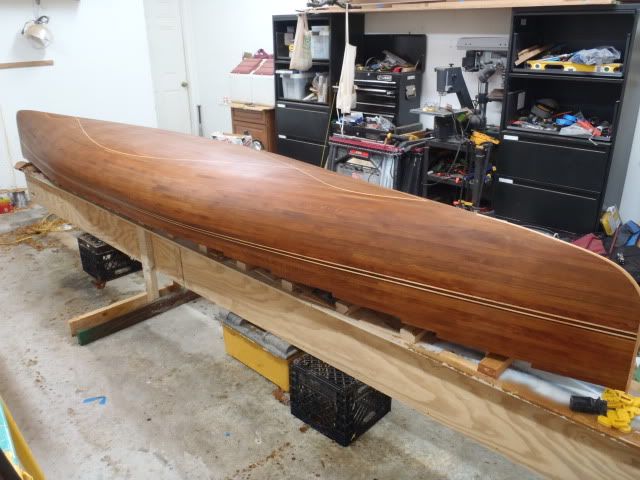
So the day has FINALLY come, I laid the last strip yesterday afternoon! I wasn't sure I would ever get this thing stripped, but I have to say I think it was worth the wait. That being said there is nothing in this world that would convince me to put another pinstripe on the bottom of a boat! I am pretty sure I could have had this boat finished and slimed by now if I had not done the stripe. I know I sound like I am griping a lot but I am VERY happy with the way she has turned out. 
Now for the sick part, Gerald and I are already hatching a plan for another build (we are all sick and in desperate need of professional help), and this one i going to be something very special
Now on to the pictures:
Last two strips:
And then there was only one:
At last, none
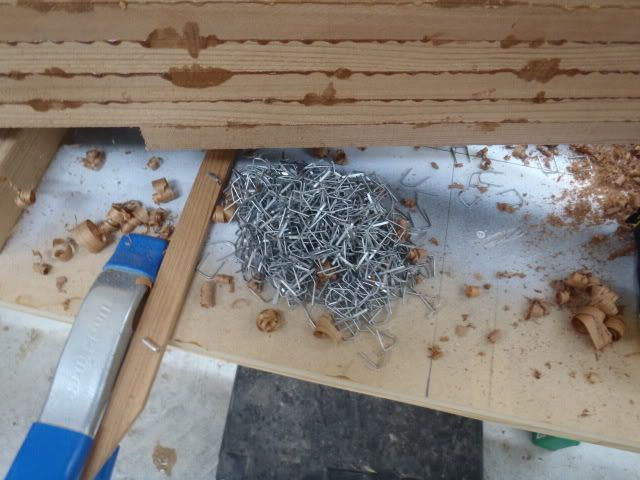
Pulled a lot of these:
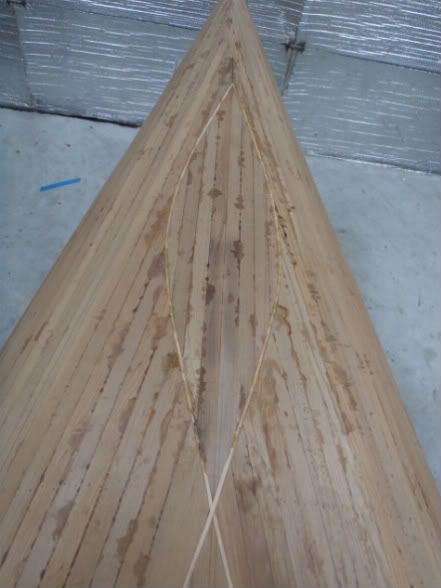
and then did a little sanding to clean the glue off the pinstripe and reveal my treasure:
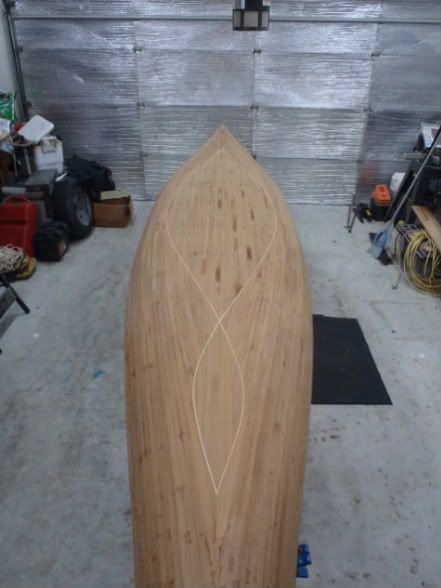
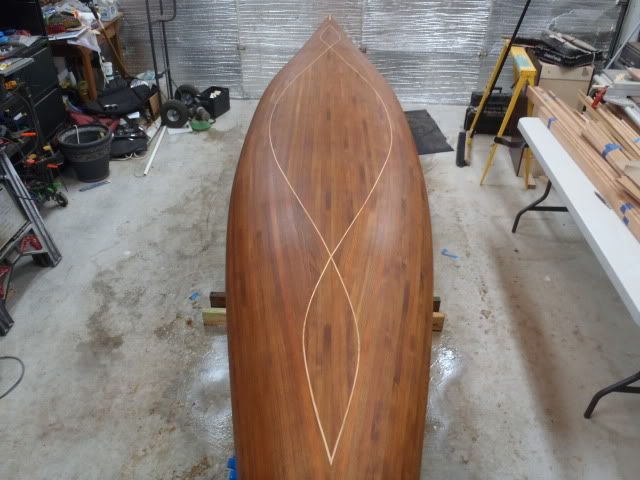
Closeup of the pinstripe:
Now for the sick part, Gerald and I are already hatching a plan for another build (we are all sick and in desperate need of professional help), and this one i going to be something very special
Now on to the pictures:
Last two strips:
And then there was only one:
At last, none
Pulled a lot of these:
and then did a little sanding to clean the glue off the pinstripe and reveal my treasure:
Closeup of the pinstripe:
-
bowgarguide
- TKF 5000 Club
- Posts: 5370
- Joined: Mon Jan 15, 2007 7:52 pm
Re: Merlin - Last Strip Installed!!! 9-20-10
Repeat after me My name is Toby I am a boat building junkie
Toby your Merlins looking great .
Ron
-
barditch
- TKF 2000 club

- Posts: 2426
- Joined: Sat Apr 12, 2008 8:42 pm
- Location: Guadalupe County
- Contact:
Re: Merlin - Last Strip Installed!!! 9-20-10
Plumb, purely purty! Great job!
Red


Re: Merlin - Last Strip Installed!!! 9-20-10
Very cool! Feels like you're almost done, doesn't it? Hah, that was just the fun part. Now stop dreaming, and do yourself a favor and get a couple of scrapers, if you haven't already. You're fixin' to NEED 'em. 
The carbide scraper from Lowe's will endear itself to you in no time. Make sure it's carbide, and not steel.

For the inside, better go ahead and order one of these:
http://www.newfound.com/images/MS200-MB206L.JPG" onclick="window.open(this.href);return false; (TKF won't display this photo, too many 600 pixies)
You want this blade:

You may be amazed at how small, lightweight, and insignificant it looks when it arrives, but take it from me, the little <censored> is a powerhouse tool you don't even want to think about trying to do without. One of those paddle makers on this forum is showing a very similar looking thing from Sears, so I suppose it's possible to get it locally. I ordered mine from Newfound Woodworks:
http://www.newfound.com/tools.htm" onclick="window.open(this.href);return false;
The carbide scraper from Lowe's will endear itself to you in no time. Make sure it's carbide, and not steel.
For the inside, better go ahead and order one of these:
http://www.newfound.com/images/MS200-MB206L.JPG" onclick="window.open(this.href);return false; (TKF won't display this photo, too many 600 pixies)
You want this blade:
You may be amazed at how small, lightweight, and insignificant it looks when it arrives, but take it from me, the little <censored> is a powerhouse tool you don't even want to think about trying to do without. One of those paddle makers on this forum is showing a very similar looking thing from Sears, so I suppose it's possible to get it locally. I ordered mine from Newfound Woodworks:
http://www.newfound.com/tools.htm" onclick="window.open(this.href);return false;
Re: Merlin - Last Strip Installed!!! 9-20-10
What a great looking canoe. You guys amaze me. ET
-
bowgarguide
- TKF 5000 Club
- Posts: 5370
- Joined: Mon Jan 15, 2007 7:52 pm
Re: Merlin - Last Strip Installed!!! 9-20-10
Funny how one build helps another build. I ask the question about if the pinstripe would effect the strength, was told no it didn't, the reason for that question was I had some of the 1 1/2 strips that had some knots and burl to them that were really pretty . it helped make up my mind to incorporate them in my hull.
Ron
Ron
-
Light Keeper's Kid

- TKF 1000 Club

- Posts: 1528
- Joined: Tue Nov 11, 2008 6:37 pm
- Location: Stuck in the Middle, Wadefish 15' -Heritage 9.5 Angler (OlllllO)
Re: Merlin - Last Strip Installed!!! 9-20-10
Mike
-
Carver

- TKF 2000 club
- Posts: 2696
- Joined: Wed Apr 11, 2007 7:53 pm
- Location: Plano / Lake Texoma
- Contact:
Re: Merlin - Last Strip Installed!!! 9-20-10
Congrats on a great build and thread. Thanks for sharing !
Phill
Phill
-
Dogpaddlin
- Posts: 874
- Joined: Tue Sep 18, 2007 5:34 pm
- Location: Round Rock
Re: Merlin - Last Strip Installed!!! 9-20-10
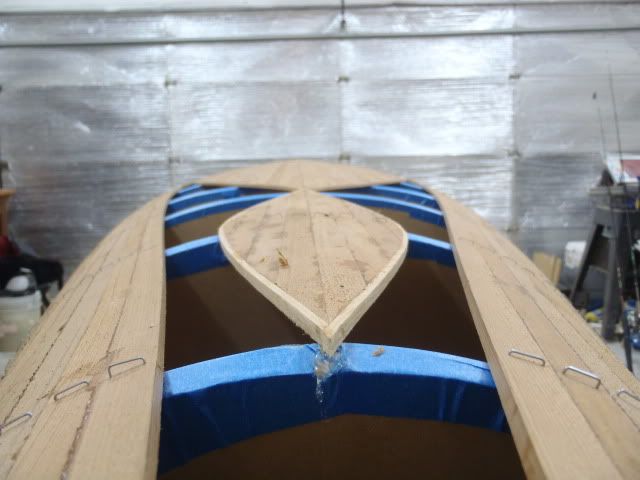
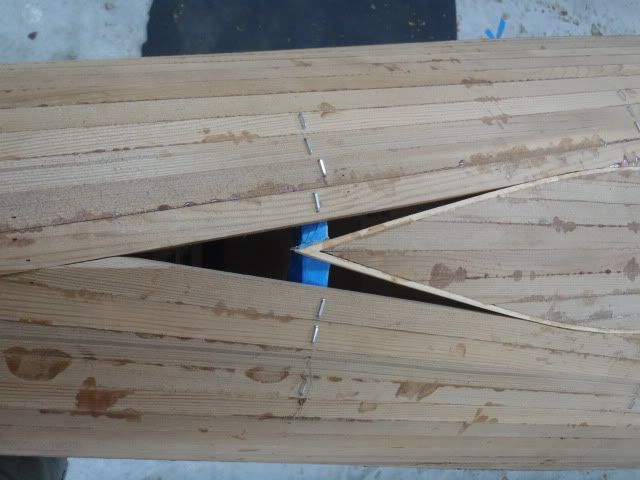
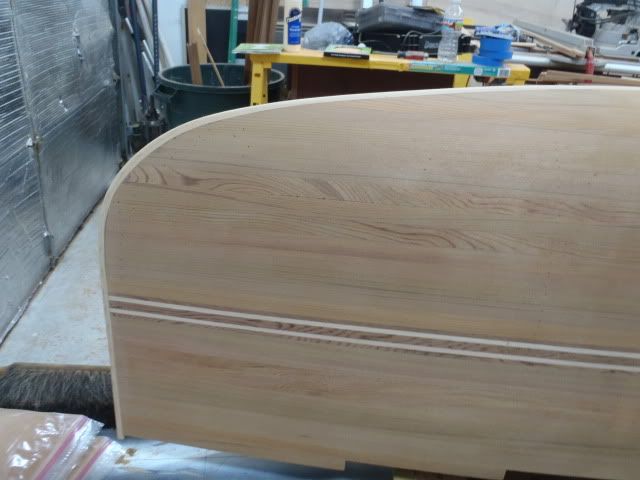
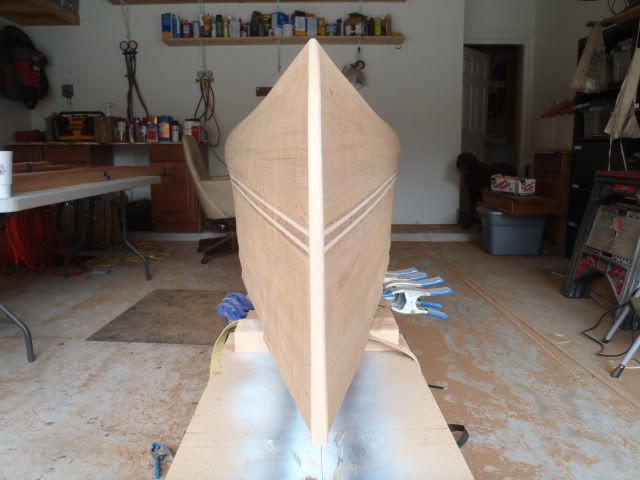
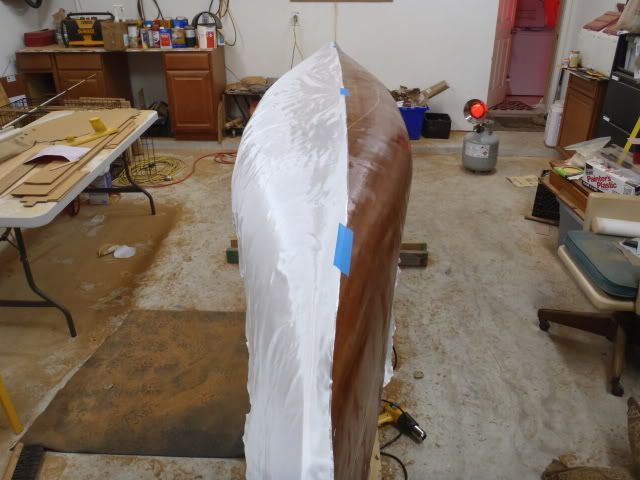
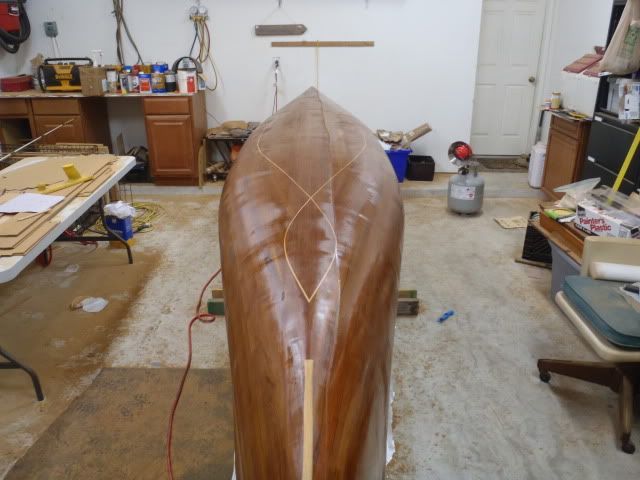
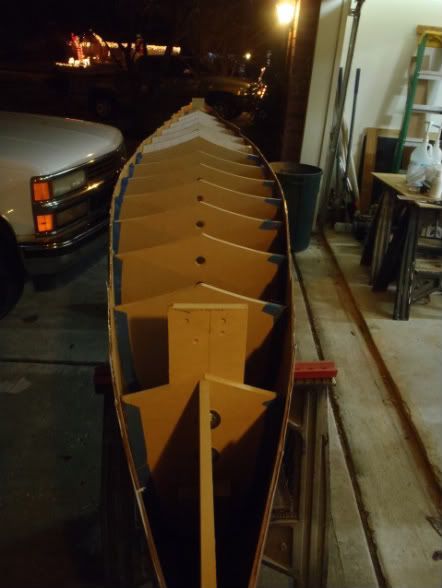
Work on the Merlin has commenced again! I finally got around to installing the stems last weekend. I had really been dreading this particular task, no reason, I just had. Turns out it was actually a fun experience. I cut my stems down to about 1/8" and laminated two strips to each end. I used a heat gun (tip from Pogo's website) to "persuade" the strips into shape, works pretty good! Sorry, no pics of that step.
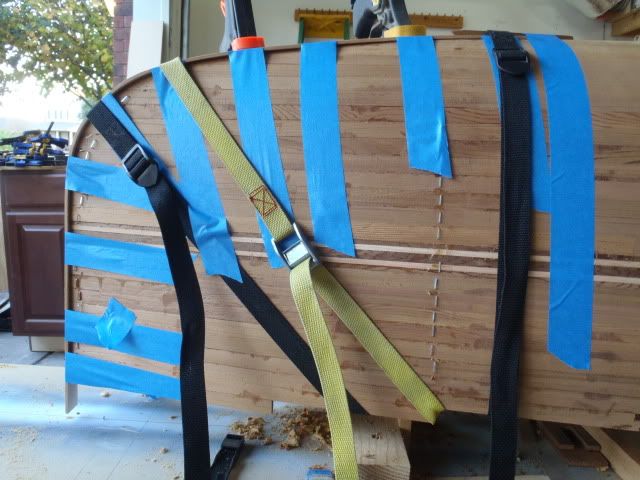
I then shaped the stems using my block plane and sander. It amazes me how finished it looks with the stems in place. I then did the initial fairing of the entire hull.
Next I soaked it with a water hose to swell all the staple holes. This was probably the most rewarding thing I have done in a long time. My first peak at the final product! Needless to say I am really happy with the way she is turning out!


My wife has to work Thanksgiving so I will not be traveling. I ordered my fiberglass and epoxy and plan to fiberglass the outside of the hull next week.
I then shaped the stems using my block plane and sander. It amazes me how finished it looks with the stems in place. I then did the initial fairing of the entire hull.
Next I soaked it with a water hose to swell all the staple holes. This was probably the most rewarding thing I have done in a long time. My first peak at the final product! Needless to say I am really happy with the way she is turning out!
My wife has to work Thanksgiving so I will not be traveling. I ordered my fiberglass and epoxy and plan to fiberglass the outside of the hull next week.
-
bowgarguide
- TKF 5000 Club
- Posts: 5370
- Joined: Mon Jan 15, 2007 7:52 pm
Re: Merlin - Stems installed and initial sanding 11-20-10
Thats looking great.
Ron
Ron
Re: Merlin - Stems installed and initial sanding 11-20-10
Hah, you think that's pretty neato, just wait till you get 'er on the water! In October I went three weeks putting more miles on my Merlin than the truck, and just love the boat more every time I use it. 
Have you given any thought to the seating arrangement yet?
Have you given any thought to the seating arrangement yet?
- Attachments
-
- ilsp5.jpg (40.42 KiB) Viewed 5088 times
Re: Merlin - Stems installed and initial sanding 11-20-10
Wow. Just wow!
I stripped 2 small decks today and now have a newfound admiration for you guys that can do entire boats. This stuff is a lesson in patience for sure.
I stripped 2 small decks today and now have a newfound admiration for you guys that can do entire boats. This stuff is a lesson in patience for sure.
-
Dogpaddlin
- Posts: 874
- Joined: Tue Sep 18, 2007 5:34 pm
- Location: Round Rock
Re: Merlin - Stems installed and initial sanding 11-20-10
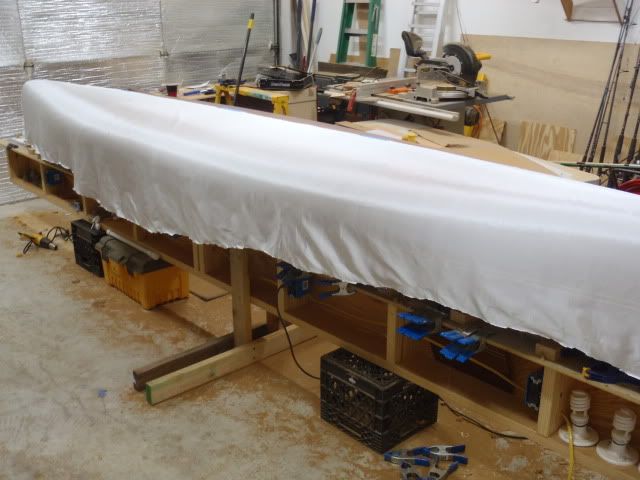
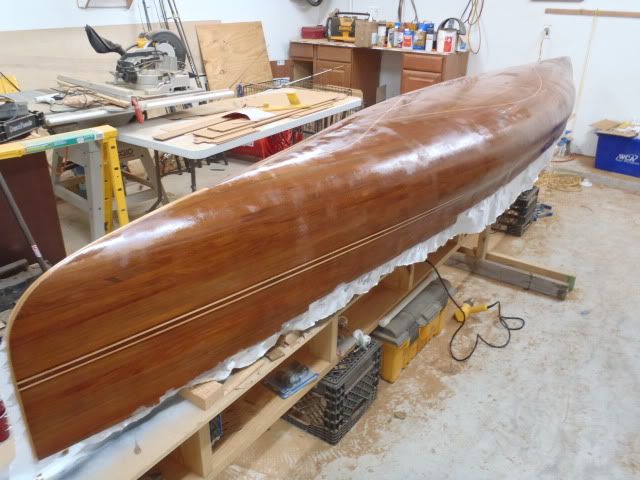
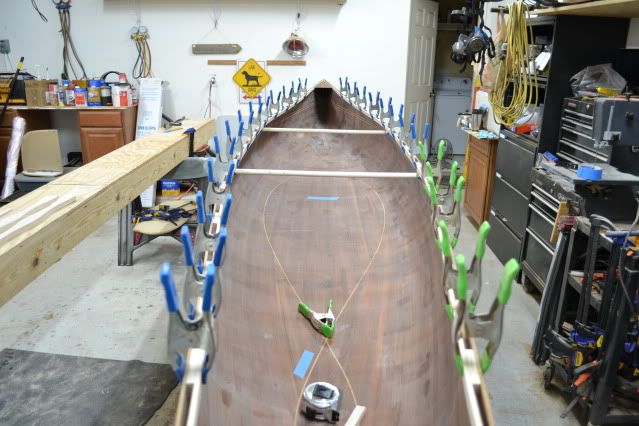
I got the outside of the Merlin fiberglassed over the Thanksgiving holiday. I know this report is little late, but better late than never!
Laying the first layer of fiberglass on half the boat.
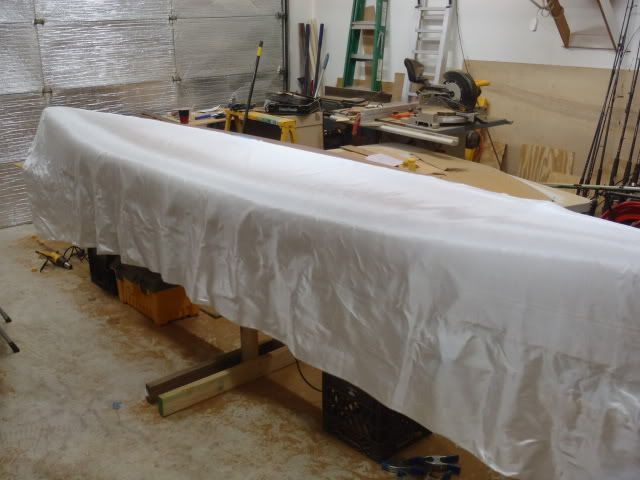
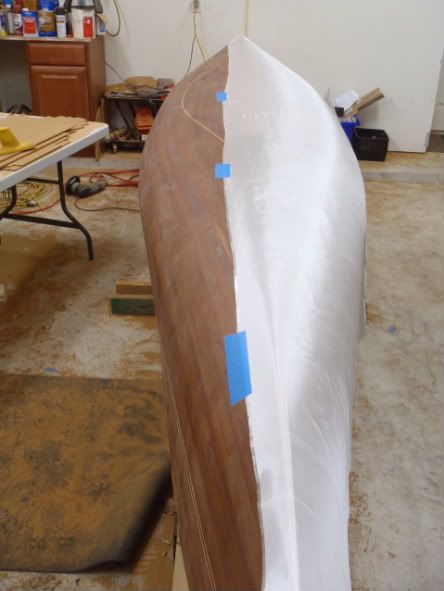
Here I have smoothed the glass out with my hand and “massaged” it in order to make it conform to all the curves of the boat, then I trimmed the excess off.
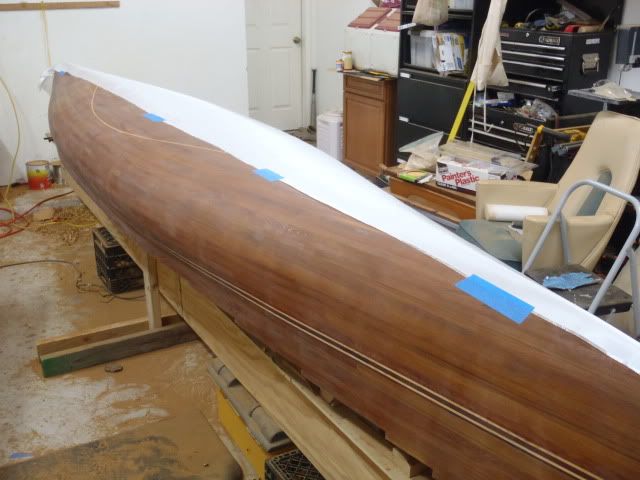
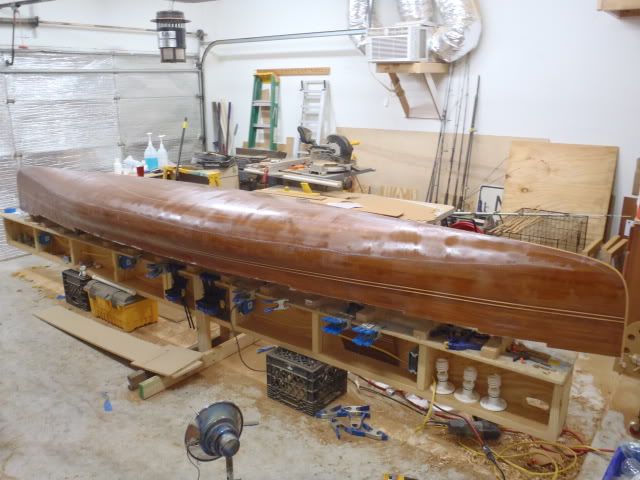
Next I applied the epoxy. This is the third boat I have built and every time I get to this point I am still amazed how the fiberglass can become completely transparent.
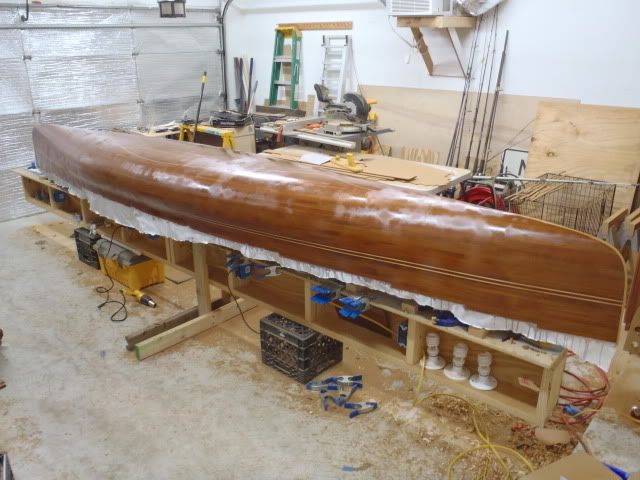
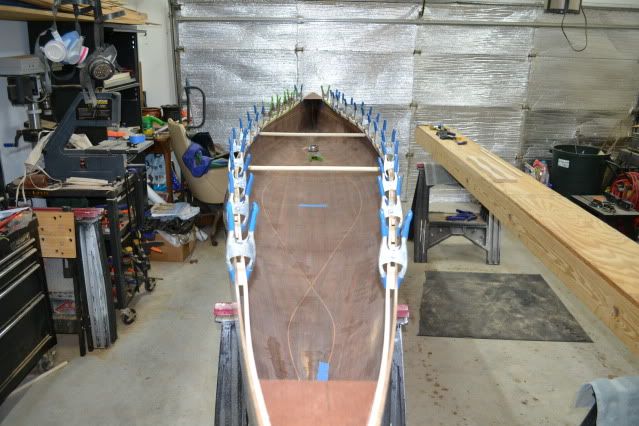
After wetting out the first side I overlap the second side by about 6 inches and repeat the process.
At this point we now have one full layer of glass covering the entire hull and about a 6” strip down the center that has two layers.
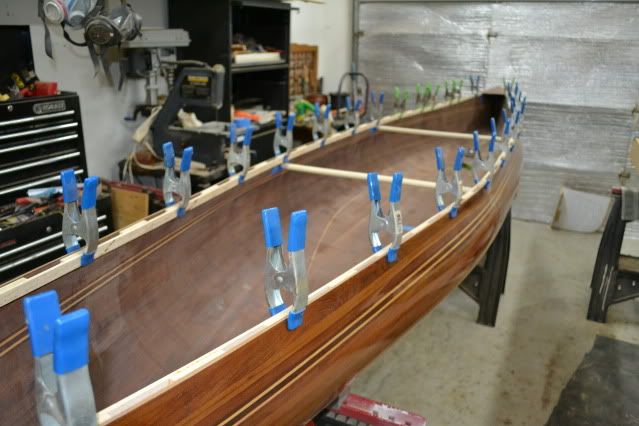
I added a second layer to the bottom for additional strength and abrasion resistance.
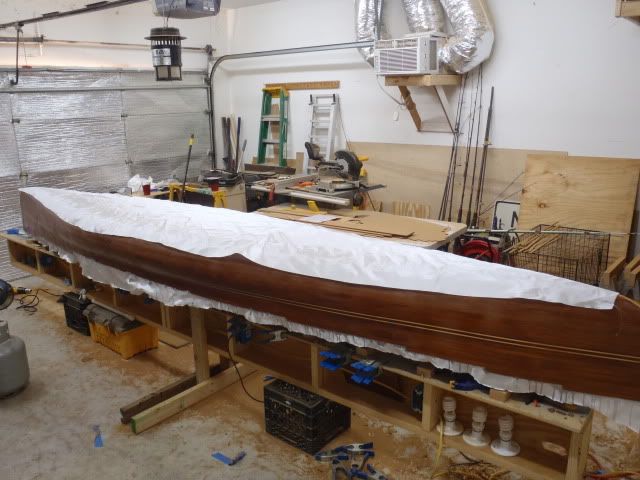
Since the ends will receive the most abuse I added a couple of additional strips of fiberglass to these areas.

You can still see where the added layers end and after I added another coat of epoxy the layers were still a hazy white.
After the epoxy cured I enlisted my wife's help to take it off the strongback. Here is a shot of it sitting in the driveway with all the forms still intact. Each form was stuck from wood glue that had seeped through the strips. I had to take a hammer and tap each form to remove it from the boat.
At this point I have all the fill coats done, it took two very thin coats applied with a roller. For this build I used 3.16oz S-glass from Thayercraft and epoxy from Resin Research. This was recommended to me on another board. With the S-glass you need to use an epoxy with a lower viscosity. I also had a heater running in my shop, had a heat lamp on my bottles of epoxy and used a heat gun in the wet out process. I had over half the boat done before I started using the heat gun and I have to say, you can tell the difference. The cloth much more difficult to wet out but it is possible, it take some more work. I will use this cloth again, but not on a build that I am greatly concerned about the appearance.
Laying the first layer of fiberglass on half the boat.
Here I have smoothed the glass out with my hand and “massaged” it in order to make it conform to all the curves of the boat, then I trimmed the excess off.
Next I applied the epoxy. This is the third boat I have built and every time I get to this point I am still amazed how the fiberglass can become completely transparent.
After wetting out the first side I overlap the second side by about 6 inches and repeat the process.
At this point we now have one full layer of glass covering the entire hull and about a 6” strip down the center that has two layers.
I added a second layer to the bottom for additional strength and abrasion resistance.
Since the ends will receive the most abuse I added a couple of additional strips of fiberglass to these areas.
You can still see where the added layers end and after I added another coat of epoxy the layers were still a hazy white.
After the epoxy cured I enlisted my wife's help to take it off the strongback. Here is a shot of it sitting in the driveway with all the forms still intact. Each form was stuck from wood glue that had seeped through the strips. I had to take a hammer and tap each form to remove it from the boat.
At this point I have all the fill coats done, it took two very thin coats applied with a roller. For this build I used 3.16oz S-glass from Thayercraft and epoxy from Resin Research. This was recommended to me on another board. With the S-glass you need to use an epoxy with a lower viscosity. I also had a heater running in my shop, had a heat lamp on my bottles of epoxy and used a heat gun in the wet out process. I had over half the boat done before I started using the heat gun and I have to say, you can tell the difference. The cloth much more difficult to wet out but it is possible, it take some more work. I will use this cloth again, but not on a build that I am greatly concerned about the appearance.
-
gerald
- TKF 4000 Club
- Posts: 4174
- Joined: Thu Jun 12, 2003 10:48 am
- Location: Gatesville, tx www.theoldmansboats.com
Re: Merlin - Outside Fiberglassed 12-14-10
This may just be your third boat but your work habits, skill, and attention to detail put you in the upper rank of builders. Very well done. I think you're really going to like this boat. I know I do!
-
Terry G.

- Posts: 631
- Joined: Wed Jul 19, 2006 8:36 am
- Location: www.terry-g.net/ink
- Contact:
Re: Merlin - Outside Fiberglassed 12-14-10
ya know guys i am way to old to start a project like the above but i "sure" get a kick out of watching you all building your stuff, its like reading a really good story and having to put the book down and go to bed and hoping when ya wake up more story has been added to the book.
congrats guys and thanks.
congrats guys and thanks.
-
preacher

- TKF 2000 club
- Posts: 2386
- Joined: Wed Aug 15, 2007 8:56 am
- Location: Winnie, Texas
- Contact:
Re: Merlin - Outside Fiberglassed 12-14-10
I agree with Gerald, that boat is a step above. Beautiful work.
-
Dogpaddlin
- Posts: 874
- Joined: Tue Sep 18, 2007 5:34 pm
- Location: Round Rock
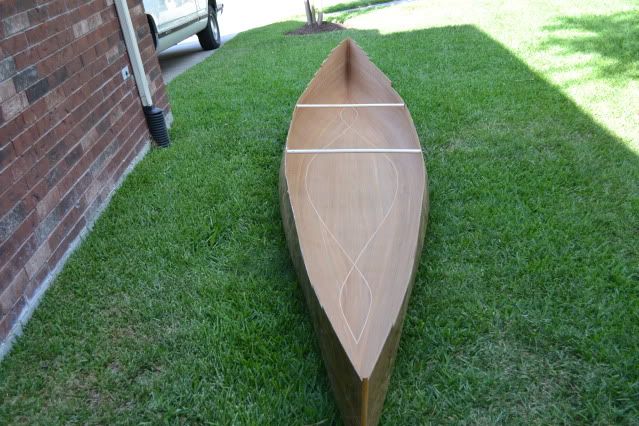
Re: Merlin - Inside Sanded and Prepped 6-3-11
So six months have passed and almost no progress had been made on the Merlin until last weekend when the wife and new baby decided to go to Lubbock for the weekend. I managed to get about 90% of the inside hull scraped prior to my hiatus so I finished up this and then broke out the old sander and went to work. What a PITA!!! All I can say is at least it is done now If all goes well I will glass the inside this weekend. I also ripped my gunnels and have them standing by for installation one evening next week, we will see what momma and Baby Ben have to say about that!
Inside sanded:
Inside sanded:
-
bowgarguide
- TKF 5000 Club
- Posts: 5370
- Joined: Mon Jan 15, 2007 7:52 pm
Re: Merlin - Inside Sanded and Prepped 6-3-11
Toby
That is looking awesome.
Ron
That is looking awesome.
Ron
-
Dogpaddlin
- Posts: 874
- Joined: Tue Sep 18, 2007 5:34 pm
- Location: Round Rock
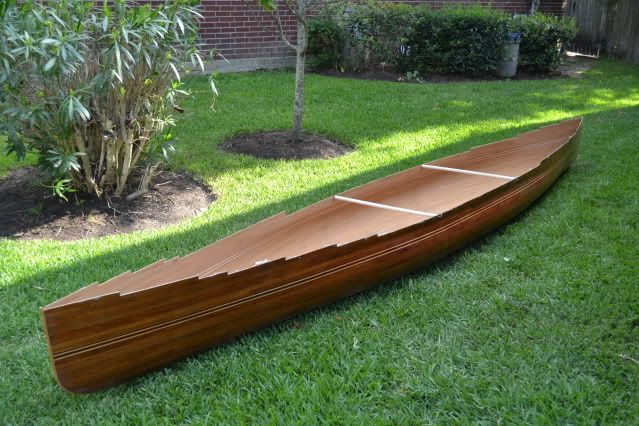
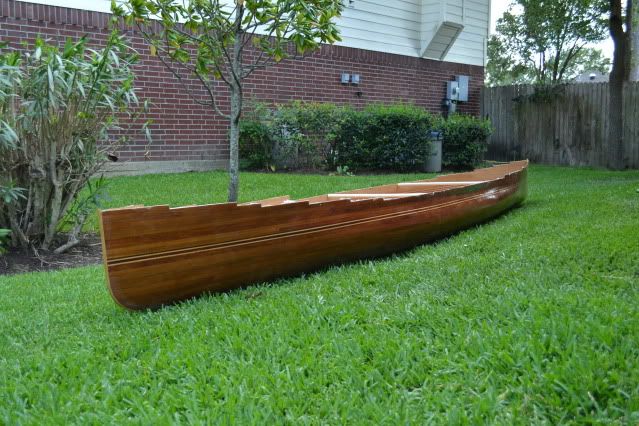
Re: Merlin - Inwales 6-13-11
Have been making some progress on the Merlin over the last few weeks. I had intended to fiberglass the inside of the hull last weekend but discovered I was about 5yds short of material. I placed an order the end of last week and it should be here by Wednesday which means now I am going to have to decide weather to glass the hull or go to the Bash in Seadrift this weekend 
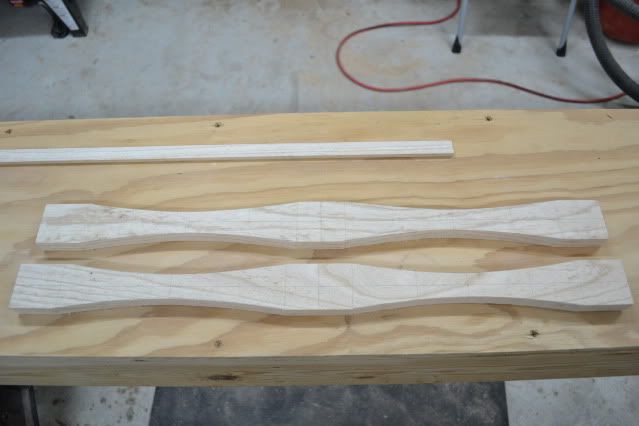
Not being able to fiberglass did give me the opportunity to work on the gunnels, thwarts and decks however. I purchased a nice piece of ash from Clark's Hardwoods a while back and then ripped it into strips a few weeks ago. I am planning to use this for all my gunnels and the thwarts.
Laying out the thwarts:
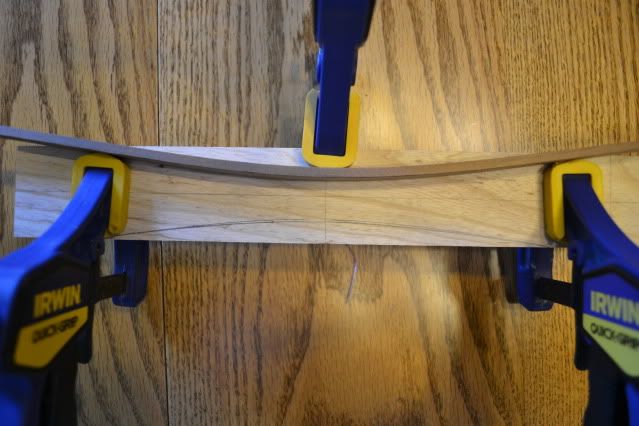
Then I rough cut the thwarts on the band saw, they still need a bunch of work but at this point. I am going to try to finish them one evening this week.
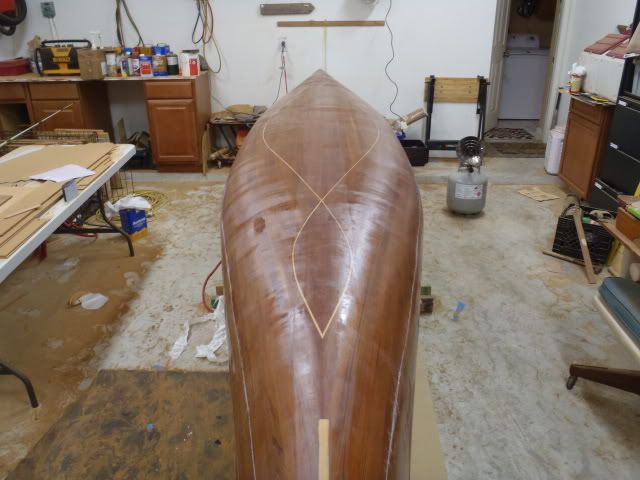
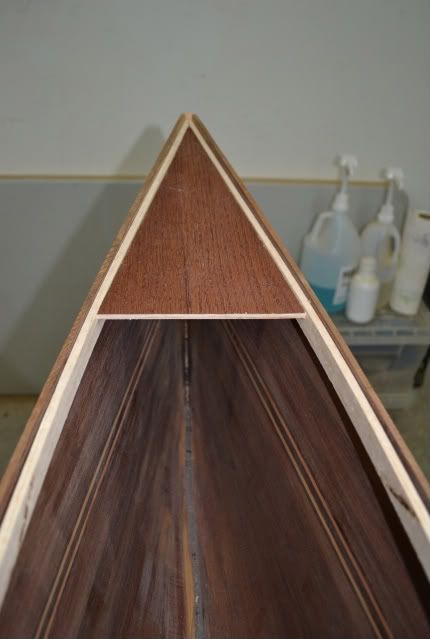
I made some some temporary spacers out of scrap cedar to hold the bow and stern to the correct width (seen below taped in place) and then cut some temporary decks out of some scrap plywood I had laying around. These are just to help align everything with the gunnels and will provide a nice template for the final decks. The final product will be a little more fancy, I have a nice piece of mahogany I may use.
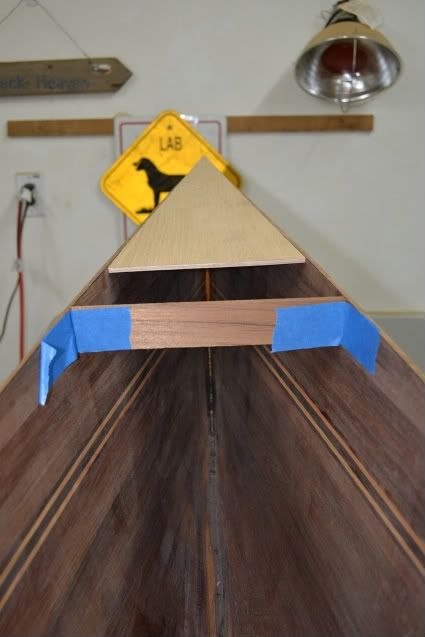
I wanted to get a better feel for what she is going to look like with finished decks so I slapped some stain on the plywood:
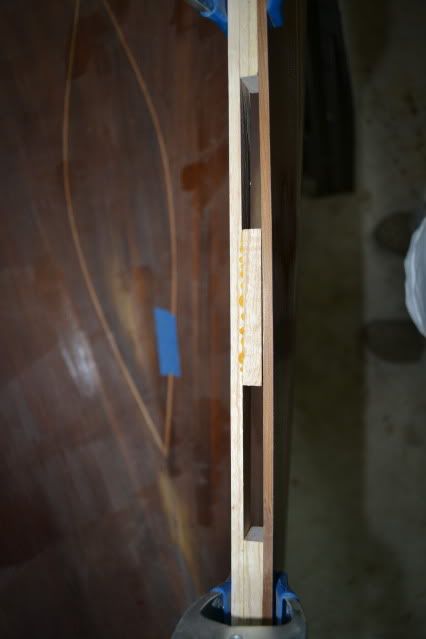
For the in-wales I briefly considered cutting them from one solid piece but then opted to rip a set of 1/4 inch strips, another set of 3/8 inch strips for the scuppers and then glue them together.
Just a few pictures of the overall progress:

I am happy with the progress and I think/hope I will have it ready for its first float by July 4th!
Not being able to fiberglass did give me the opportunity to work on the gunnels, thwarts and decks however. I purchased a nice piece of ash from Clark's Hardwoods a while back and then ripped it into strips a few weeks ago. I am planning to use this for all my gunnels and the thwarts.
Laying out the thwarts:
Then I rough cut the thwarts on the band saw, they still need a bunch of work but at this point. I am going to try to finish them one evening this week.
I made some some temporary spacers out of scrap cedar to hold the bow and stern to the correct width (seen below taped in place) and then cut some temporary decks out of some scrap plywood I had laying around. These are just to help align everything with the gunnels and will provide a nice template for the final decks. The final product will be a little more fancy, I have a nice piece of mahogany I may use.
I wanted to get a better feel for what she is going to look like with finished decks so I slapped some stain on the plywood:
For the in-wales I briefly considered cutting them from one solid piece but then opted to rip a set of 1/4 inch strips, another set of 3/8 inch strips for the scuppers and then glue them together.
Just a few pictures of the overall progress:
I am happy with the progress and I think/hope I will have it ready for its first float by July 4th!
Last edited by Dogpaddlin on Mon Jun 13, 2011 10:00 pm, edited 1 time in total.
-
bowgarguide
- TKF 5000 Club
- Posts: 5370
- Joined: Mon Jan 15, 2007 7:52 pm
Re: Merlin - Inwales 6-13-11
Toby
She is looking gooddddddddd.
Ron
She is looking gooddddddddd.
Ron