I thought I was doing my calculation correct for the cloth, but I wanted to make sure they were not talking about a square yard (I guess I could have asked that instead of the calculation). Thanks for the quick response, man this is a great board!
Brazos River Rocket: Happy Paddler!
-
Dogpaddlin
- Posts: 874
- Joined: Tue Sep 18, 2007 5:34 pm
- Location: Round Rock
Re: Brazos River Fishing Rocket: Layout comlete...
I thought I learned my lesson about the pencil marks on the pirogue, but I guess I needed a refresher course 
I thought I was doing my calculation correct for the cloth, but I wanted to make sure they were not talking about a square yard (I guess I could have asked that instead of the calculation). Thanks for the quick response, man this is a great board!
I thought I was doing my calculation correct for the cloth, but I wanted to make sure they were not talking about a square yard (I guess I could have asked that instead of the calculation). Thanks for the quick response, man this is a great board!


Re: Brazos River Fishing Rocket: Layout comlete...
Those were both great questions, since everything that appears here becomes part of the record, part of the collective wisdom. Believe me, that pencil mark business is a chronic recurring theme to cabinet shop owners who take the time to train new guys, and as many times as I've seen it with my own eyes I'm really happy to see it brought up here. It doesn't seem like a big deal, but if you think about it, few things can be a bigger deal to a woodworker.
Also great to bring up the cloth-calculating question, which came up on Moder's thread a couple days ago and didn't get a response from G. (stands for Guru). Whatever, it's always a good thing to emphasize that the guy or gal on the phone who you're buying stuff from can help. Because they do it all the time. And that makes them experts.
Also great to bring up the cloth-calculating question, which came up on Moder's thread a couple days ago and didn't get a response from G. (stands for Guru). Whatever, it's always a good thing to emphasize that the guy or gal on the phone who you're buying stuff from can help. Because they do it all the time. And that makes them experts.

Re: Brazos River Fishing Rocket: Layout comlete...
On the graphite,I ordered a pound and have done three boats now and still have 1/2 pound left.
-
gerald

- TKF 4000 Club

- Posts: 4174
- Joined: Thu Jun 12, 2003 10:48 am
- Location: Gatesville, tx www.theoldmansboats.com
Re: Brazos River Fishing Rocket: Layout comlete...
Regardless of how wide the cloth is you are buying a yard in length (or that's the way it is any time I've bought it). So...if you buy one yard of 36" wide cloth it will be one yard long. If you buy one yard of 60" cloth it will be one yard long.
I'm not sure what's the smallest can of powdered graphite you can buy. You will need about, or less than, a cup to do the hull of the average boat. I mix a heaping tablespoonfull with approximately 8 oz. of epoxy--and usually do 3 coats. I also just buy a quart can for about $15 from Sweet Composites.
I'm not sure what's the smallest can of powdered graphite you can buy. You will need about, or less than, a cup to do the hull of the average boat. I mix a heaping tablespoonfull with approximately 8 oz. of epoxy--and usually do 3 coats. I also just buy a quart can for about $15 from Sweet Composites.
-
Iamdamoder
- TKF 1000 Club

- Posts: 1786
- Joined: Mon Feb 04, 2008 8:35 am
- Location: San Antonio
Re: Brazos River Fishing Rocket: Layout comlete...
Very sharp and moving forward.
Good to see those pics.
Good to see those pics.
-
Dogpaddlin
- Posts: 874
- Joined: Tue Sep 18, 2007 5:34 pm
- Location: Round Rock
Re: Brazos River Fishing Rocket: Layout comlete...
Were you worried I wasn't going to shareVery sharp and moving forward.
Good to see those pics.
I got a little more done last night and then set my alarm for early this morning so I could spend a little time in the garage before having to come to work.
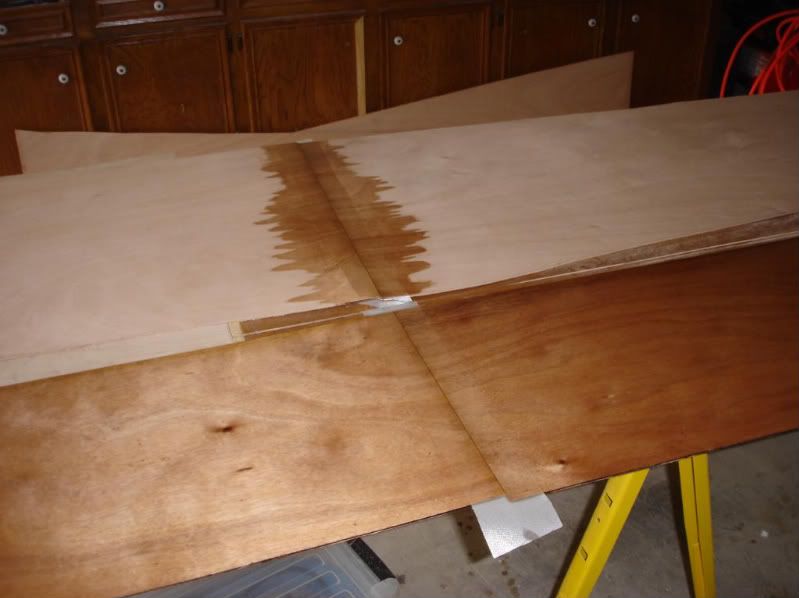
Sanded the excess goopie from yesterday, left a nice clean line, but I think I will practice the scarf joint during some of my downtime over the next few weeks.
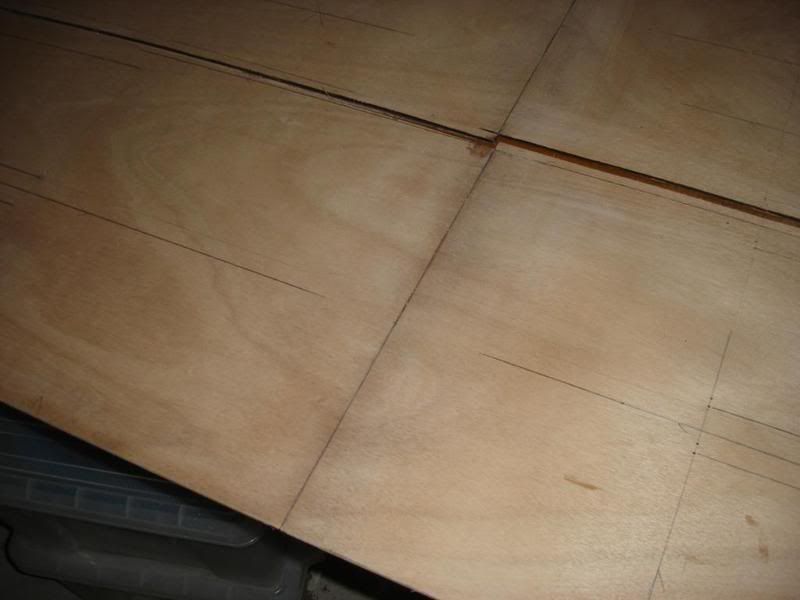
Then taped the joint on one side and let it set up overnight.
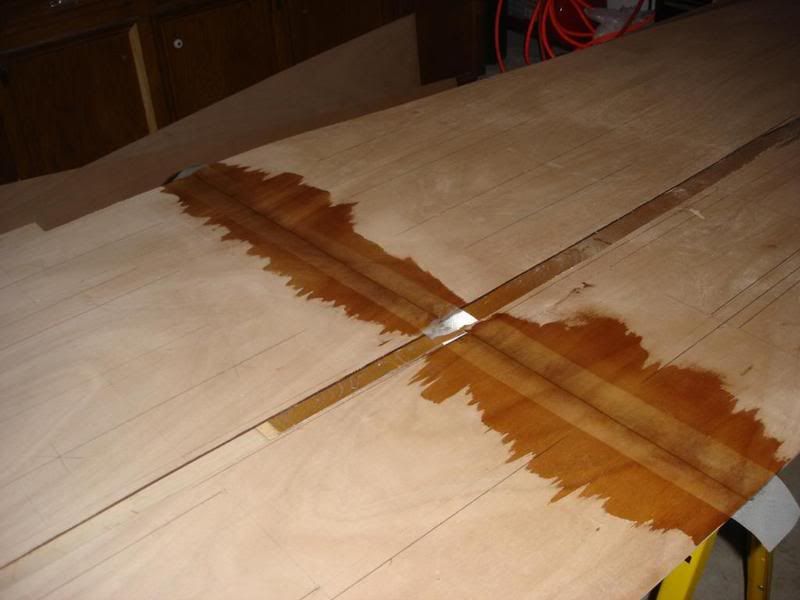
Got up early this morning and flipped the pieces and taped the other side of the joint. I did not want to wast any more epoxy so I went ahead and saturated one of the pieces. I am amazed at how much millage I got out of the epoxy using a bondo squeegee
I think Gerald said that you can put a fill coat on after the epoxy became tacky (I don't remember if I read it or he told me at Stubblefield). Is this the case? If so, I may go home at lunch and put a coat on. I do remember he said the sanding dust would leave little white specs that would not be that noticeable in this small of an area, but my OCD is kicking in
Re: Brazos River Fishing Rocket: Layout comlete...
You can apply fill coats as soon as the existing coat is stiff enough for you to apply it without brushing off what's already there, that's all you need. Make sense?
When you slop fresh epoxy onto some that's already there, but isn't totally cured, you get what's referred to as a chemical bond, where there's something of a meet-and-greet amongst the little epoxy molecules, and it becomes a real mixer with lots of shacking up going on afterward. But if the existing coat has cured solid, then the best you can get with a fresh application is called a mechanical bond, which roughly means roughing up the surface to give the new stuff something to grip onto; the same thing as hitting an old coat of paint with sandpaper so that new paint will stick and not peel off.
So yes, as soon as you can get away with it is actually best for fill coats.
Scarf joints go together in one session, then they're done and you're outa there. Those butt joints look like a shortcut that takes twice as long. Hey, I'm entitled to my personal opinion!
-
Dogpaddlin
- Posts: 874
- Joined: Tue Sep 18, 2007 5:34 pm
- Location: Round Rock
Re: Brazos River Fishing Rocket: Layout comlete...
Settle down nowScarf joints go together in one session, then they're done and you're outa there. Those butt joints look like a shortcut that takes twice as long. Hey, I'm entitled to my personal opinion!
Along those notes, I am looking at buying a block plane. Is this one of those things where I can by a less expensive model or should I get a good quality product? I know the Stanley 60 1/2 gets high marks on this board, but they are pricey at $80. Here is what I was looking at:
http://www.lowes.com/lowes/lkn?action=p ... lpage=none" onclick="window.open(this.href);return false;
http://www.lowes.com/lowes/lkn?action=p ... lpage=none" onclick="window.open(this.href);return false;
-
gerald
- TKF 4000 Club
- Posts: 4174
- Joined: Thu Jun 12, 2003 10:48 am
- Location: Gatesville, tx www.theoldmansboats.com
Re: Brazos River Fishing Rocket: Layout comlete...
The 60 1/2 is pretty much the standard for fine block planing (there are better ones!). The 10" plane is way too big. The 7" would be ok for someone with big hands. I have very strong, wide hands but my fingers are short so I prefer a narrow, lightweight, 6" block plane. Good block planes cost money. The one I use the most is a cheapie, but a goodie. It's a Stanley #118P block plane. I generally buy my block planes on ebay. Since I have about a hundred, or more (...my block plane collection!) that means I look quite often. For hard, rough block planing--such as the edges of decks and hulls to clean the expoy and fiberglass--I'll use the modern rendition of the 60 1/2. Can't remember the number but it's pretty close to the 7" plane you have listed. It's not a very good plane, needs lots of work and tuning, but can be made servicable--and I don't mind abusing it a bit.
Re: Brazos River Fishing Rocket: Layout comlete...
They don't say on the Lowe's site you link to, but it appears to me the 7" one is a "low angle" job. Actually, all block planes are considered low angle (as compared to most all other types of hand planes). Anyway, the low angle block plane has an iron set at 12.5 degrees instead of the usual 25 degrees. I like the low angle much better. Whatever, they look good to me.
I have a grand total of two block planes, the Stanley 25 degree job I started with, and a low angle one I got from CLC. Both about $40. I'd like to invest in one of those really nice Lie-Nelsons or Veritas beauties one day, but it's hard to do when the ones I have work so well.
Google "scary sharp" for a great and easy way to start honing plane irons. I used it for a while, then went to Japanese waterstones. I use the scary sharp stuff to true up the stones now.
-
Dogpaddlin
- Posts: 874
- Joined: Tue Sep 18, 2007 5:34 pm
- Location: Round Rock
Re: Brazos River Fishing Rocket: Layout comlete...
Quick question, I have everything stitched together (I will post the pictures later this afternoon) and I am ready to start spot welding (correct term) the hull. Does it matter if I do it on the inside or the outside of the hull? I can't see how it would but I thought I would ask.
-
gerald
- TKF 4000 Club
- Posts: 4174
- Joined: Thu Jun 12, 2003 10:48 am
- Location: Gatesville, tx www.theoldmansboats.com
Re: Brazos River Fishing Rocket: Layout comlete...
Ok...if you've got the hull stitched and aligned you are ready to fillet between the stitches. I assume that's what you mean by "spot weld". You should do the small fillets between the wires on the inside of the boat first. The next day, remove the wires, and do your complete fillet. If you are using wood flour/epoxy goopie then your fillet can be small. I generally use craft sticks from Walmart (tongue depressors), or sometimes popsicle sticks. Once the fillets are done, sanded, etc. you should apply the cloth to the inside of the hull. At this point you can temporarily or permanently install your bulkheads. Your center form will remain for shape. THEN turn the boat over, fill the cracks (these are NOT fillets), round the edges, etc.. Once you have the cloth on the outside of the boat and one fill coat, you can turn the boat back over and start the deck.
This is a very loose, basic order of doing things. I might have missed some detail or the other. It's not set in stone--just basically the way I do it. You CAN do it in any order you want depending on circumstances.
This is a very loose, basic order of doing things. I might have missed some detail or the other. It's not set in stone--just basically the way I do it. You CAN do it in any order you want depending on circumstances.
-
Dogpaddlin
- Posts: 874
- Joined: Tue Sep 18, 2007 5:34 pm
- Location: Round Rock
Re: Brazos River Fishing Rocket: Layout comlete...
This has been a productive weekend!
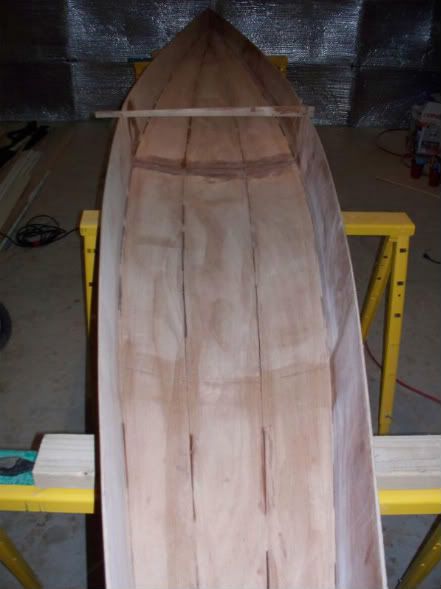
I got the panels cut out the end of last week and then used a belt sander true everything up.
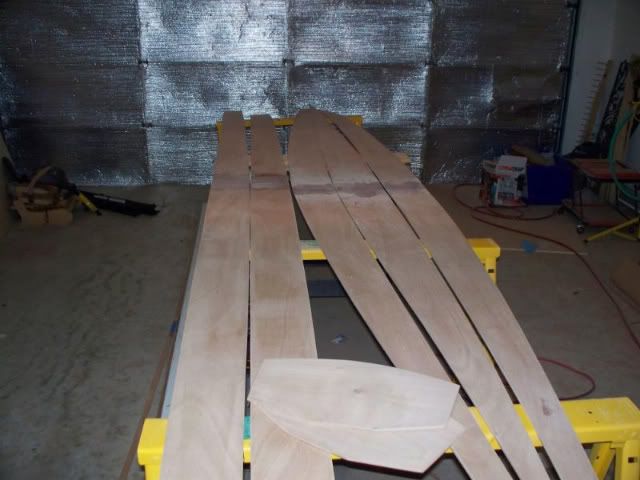
Everything aligned very nicely!
I temporarily installed the bulkheads to help line everything up.

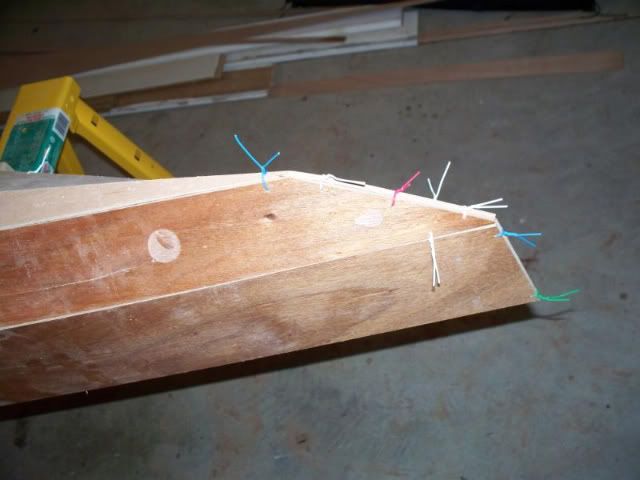
Stitching the hull together. On my last build, I used small zip ties for the stitches, for this one I used 18 gauge copper wire (thermostat wire). The zip ties were MUCH easier to use, but the wire leaves a smaller hole.
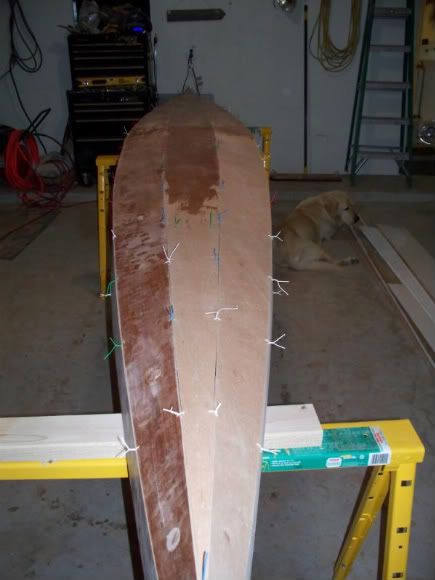
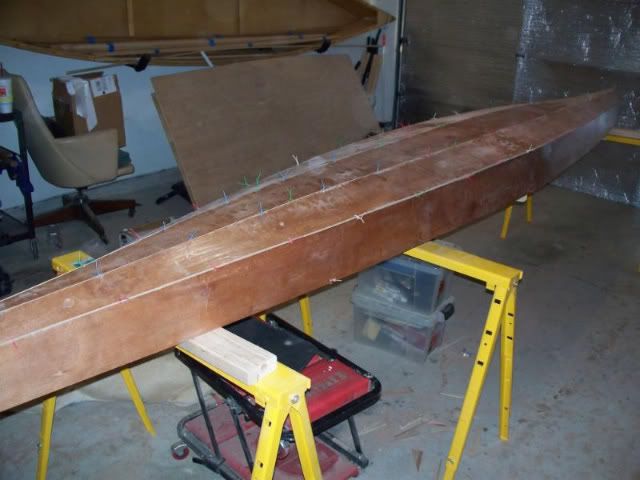
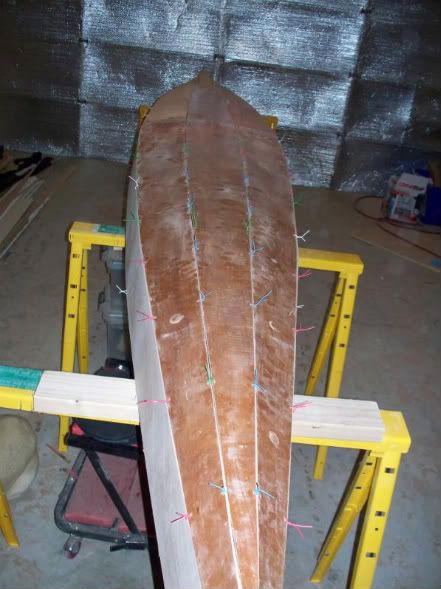
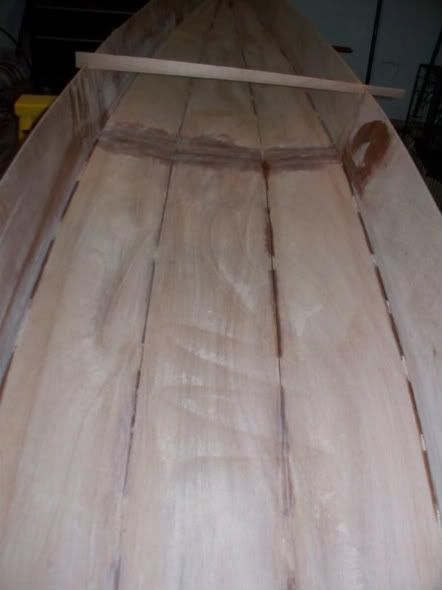
Installed the fillets between the wire.
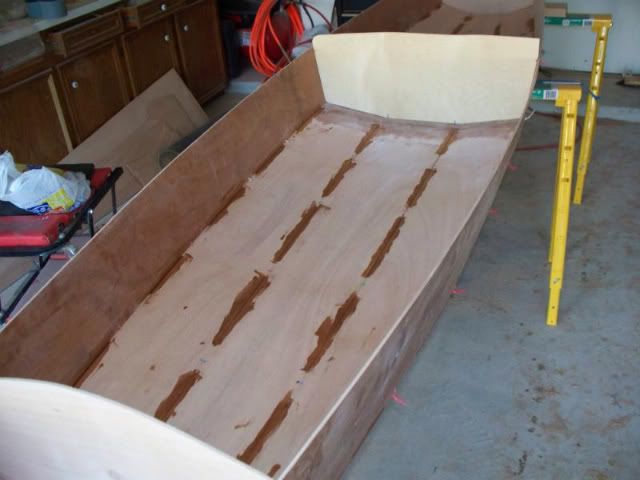

Pulled the wires and the bulkheads. I was not very careful with the goopie so I had some sanding to do.
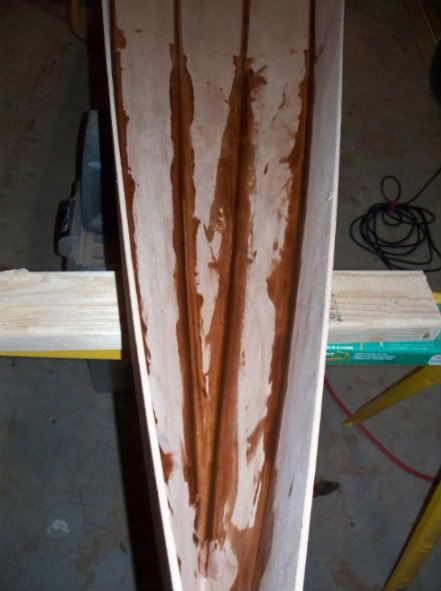
For the final fillets, I used some blue tape to help keep the lines clean. I only used it between where the bulkheads will be mounted. I should have run the tape all the way to the end.
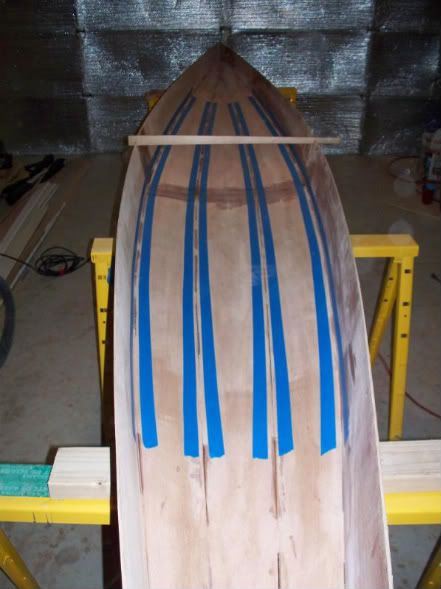
Can you tell where the tape stopped?
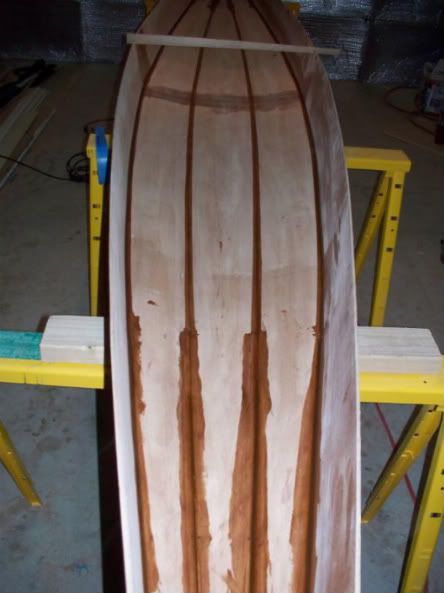
Next is a little more sanding, a saturation coat, and then interior glass!
I got the panels cut out the end of last week and then used a belt sander true everything up.
Everything aligned very nicely!
I temporarily installed the bulkheads to help line everything up.
Stitching the hull together. On my last build, I used small zip ties for the stitches, for this one I used 18 gauge copper wire (thermostat wire). The zip ties were MUCH easier to use, but the wire leaves a smaller hole.
Installed the fillets between the wire.
Pulled the wires and the bulkheads. I was not very careful with the goopie so I had some sanding to do.
For the final fillets, I used some blue tape to help keep the lines clean. I only used it between where the bulkheads will be mounted. I should have run the tape all the way to the end.
Can you tell where the tape stopped?
Next is a little more sanding, a saturation coat, and then interior glass!
-
gerald
- TKF 4000 Club
- Posts: 4174
- Joined: Thu Jun 12, 2003 10:48 am
- Location: Gatesville, tx www.theoldmansboats.com
Re: Brazos River Fishing Rocket: Fillets Almost Done...
Hard to tell. I never tape. I just do the fillet. The little ridge that comes up on each side I scrape off with a putty knife while it's soft...then clean the putty knife. Looking pretty good so far.
-
Dogpaddlin
- Posts: 874
- Joined: Tue Sep 18, 2007 5:34 pm
- Location: Round Rock
Re: Brazos River Fishing Rocket: Fillets Almost Done...
Couple more questions.
1. How do you guys work in the tight spaces , i.e. the ends. Specifically, how do you do your filleting, sanding, and fiberglass? The very ends are so tight that I can't figure out how to apply a nice smooth fillet or how I am going to get the glass smoothed out. I know some or out resident gurus (Pogo and Gerald) have got to have some cool tricks for these applications .
.
2. Going back to an earlier question about putting on a fill coat before the saturation coat is fully cured, is there any reason to only do one fill coat this way? It seems like you could save yourself a lot of trouble sanding and also not have to worry about the dreaded blush?
3. Is the dreaded blush really as big a deal as people make it out to be? FYI, I am using the U.S. Composites 3:1 epoxy.
1. How do you guys work in the tight spaces , i.e. the ends. Specifically, how do you do your filleting, sanding, and fiberglass? The very ends are so tight that I can't figure out how to apply a nice smooth fillet or how I am going to get the glass smoothed out. I know some or out resident gurus (Pogo and Gerald) have got to have some cool tricks for these applications
2. Going back to an earlier question about putting on a fill coat before the saturation coat is fully cured, is there any reason to only do one fill coat this way? It seems like you could save yourself a lot of trouble sanding and also not have to worry about the dreaded blush?
3. Is the dreaded blush really as big a deal as people make it out to be? FYI, I am using the U.S. Composites 3:1 epoxy.
Re: Brazos River Fishing Rocket: Fillets Almost Done...
1. No, no cool tricks here, mostly just a matter of doing whatever it takes. I generally use long narrow scrap wood pieces that are helped along into useful shapes with planes, stationary belt sanders, etc., to work the fillets in cramped places. Only other trick is to relax, go slow, take your time, and patiently clean up any excess while it's still wet. If you think it's a PITA to apply it now, just wait 'til you get to sand it later. If there's difficulty getting the glass to lay down, remind yourself that slopping on more epoxy doesn't help; in fact, squeegeeing some away often helps most. Go easy on the goop; as always, all you need is enough to make the cloth transparent. If you have pools forming, get the excess outa there and save yourself a little totally worthless excess weight.
2. Again, just "git-r-done". If you can't see any reason why not to apply a fill coat, then there's probably not a reason why not .... as far as I know there are no hidden booby traps. I usually allow full cure before fill coats because I use squeegees only; I want to hit the surface lightly with coarse sandpaper before application to both knock off snags, and show my progress clearly. Just one way of approximately 29,672,789,432.....
3. I have yet to see my first hint of amine blush. I have experience only with Raka 127/350 or US Composites 556/635 2:1 thin viscosity slow cure no-blush epoxy.
-
Dogpaddlin
- Posts: 874
- Joined: Tue Sep 18, 2007 5:34 pm
- Location: Round Rock
Re: Brazos River Fishing Rocket: Fillets Almost Done...
I am glad you mentioned the squeegee, that reminded me of another question I had, what are some of the other methods for applying the fill coats? I used a cheap brush (not sure if these are what people call chip brushes) and it seems to lay the epoxy on pretty THICK! Maybe this is a good thing during the fill coat? Can a roller be used, and if so, what type? Again, just looking for ideas.. Again, just "git-r-done". If you can't see any reason why not to apply a fill coat, then there's probably not a reason why not .... but as far as I know there are no hidden booby traps. I usually allow full cure before fill coats because I use squeegees only; I want to hit the surface lightly with coarse sandpaper before application to both knock off snags, and show my progress clearly. Just one way of approximately 29,672,789,432.....
Re: Brazos River Fishing Rocket: Fillets Almost Done...
Yep, thin foam rollers (check CLC, West Marine, etc. for appropriate ones) are what a lot of people use, and what CLC recommends (and remember, those guys build a LOT of boats). I tried 'em and found it wasteful. But then, I'm pretty incessant about pretending epoxy is real expensive and heavy. Gerald will tell you all about brushes, I only use them to shovel epoxy around.
I believe chip brushes are those wooden handled disposable horrors that sheds hair like a cat, but have no idea why they'd be called that. I go for the black plastic handled disposable brushes, tho' you gotta search around for 'em a little (found some at McCoy's and Ace Hardware). But they don't shed anywhere near as bad. If I had to use regular chip brushes again, I think I'd try hitting them with hot glue or wood glue or something to fix those blasted bristles in place.
I believe chip brushes are those wooden handled disposable horrors that sheds hair like a cat, but have no idea why they'd be called that. I go for the black plastic handled disposable brushes, tho' you gotta search around for 'em a little (found some at McCoy's and Ace Hardware). But they don't shed anywhere near as bad. If I had to use regular chip brushes again, I think I'd try hitting them with hot glue or wood glue or something to fix those blasted bristles in place.
-
gerald
- TKF 4000 Club
- Posts: 4174
- Joined: Thu Jun 12, 2003 10:48 am
- Location: Gatesville, tx www.theoldmansboats.com
Re: Brazos River Fishing Rocket: Fillets Almost Done...
Sanding in the tight spots I use a sharp chisel to get any larger crumbs or dabs out of the way. Then I fold 80 grit sandpaper and do it by hand. I also use emory cloth wrapped around long or short dowel rods, and I use a length of the cedar strip sometimes. In the tight spots, like pogo says, you just get it done. It doesn't have to be perfect...just look like it.
You actually have up to 24 hours with the slow epoxy to do a fill coat. Otherwise you simply want it hard enough that nothing moves or floats when you do the fill coat. While the chemical bond is better than a mechanical bond of epoxy I don't believe that anyone can really tell the difference if it's properly done. The problem of waiting to do a fill coat is, of course, the possibility of blush. Your 635/556 2 to 1 blushless combo from USComposites is pretty good about not blushing...though I have seen some very minor fish eye problems I would attribute to blush. The USComposites 3:1 mixture has a repuation for blushing. If you are using an epoxy that blushes you should endeavor to do all fill coats quickly--or in other words--while the epoxy is green. If you wait until the blush rises to the top and settles then you have to sand and wash thoroughly to get it off before you do the next coat. In most cases, regardless of the epoxy I use, I treat it as though it can blush. And, yes, blush is as big a deal as some people say it is, but with a few precautions you will have no problems. The reason why I only do one fill coat after the saturation coat is because I only want to avoid getting the white specks in the weave of the cloth as I work. I do a lot of other steps and things along the way, so I can't do the finish fill coats until all that is done. I would simply end up with a lot of extra epoxy.
Squeegeeing (hmmm...) the saturation coat is very important. I just use plastic spreaders. I do not use chip brushes. I use pretty good 2" paint brushes--about what most people use to paint with. Cheap, sure, (about $2.00 apiece) but still pretty good. Before starting I "pull" the hairs of the brush to remove any loose ones. I'll still get a few hairs but I just pick them off. The brush does put epoxy on fairly thick but that's the way I like. I "saturate" the cloth--then squeegee the excess off. I throw the excess away. I believe it is false economy to scrimp on epoxy. Certainly you can use rollers, or any thing else that allows you to get the epoxy on the boat. Using a roller you still have to come back when you're finished and point it off with a brush to help lay it down and remove air bubbles. Applying with a squeegee works fine for many people, but I would still come back and run a brush over it. What can I say--I'm a brush man! I can get really nice fill coats that don't require much sanding--if any--at all.
Did I miss anything?
I love to hear what pogo has to say also. I learn from everybody!
Re: Brazos River Fishing Rocket: Fillets Almost Done...
If you 'scrimp' on epoxy, it is not a false economy -- it is a stupid mistake, whether you meant to do it or not.gerald wrote:I believe it is false economy to scrimp on epoxy.
I believe it's safe to say, since it's generally pretty apparent, that if you 'scrimp' on epoxy, you'll know it .... either as a non-glossy, somewhat bare looking spot on otherwise unadorned wood, or as white coloration in fiberglass cloth that indicates what we call "starving the cloth". As long as you have sufficient epoxy on your work, then you're not 'scrimping'.
Edit: I hope the above comments don't sound grouchy or anything. I just happen to believe that Gerald could stand to use just a little less epoxy, and I could probably stand a wee bit more, but in any case we tend to be two old farts splitting hairs. Still, since overdoing the epoxy is a zillion times more common than using too little, I'm piping up about it as usual.
-
gerald
- TKF 4000 Club
- Posts: 4174
- Joined: Thu Jun 12, 2003 10:48 am
- Location: Gatesville, tx www.theoldmansboats.com
Re: Brazos River Fishing Rocket: Fillets Almost Done...
I do not advocate using excess epoxy. After you saturate your cloth, you come back and squeegee the excess off. That is basic. fill coats can be applied as heavy as you want as long as you can handle the runs, drips, etc.. You should apply only as many fill coats as necessary to fill the weave, protect the boat, and provide a substrate for the finish--whatever the finish is. This is all basic. This is also a matter of personal preference and experience. All you have to do is compare the finish of one of my boats to a boat with "minimum" epoxy and see which is holding up better. Use common sense.
-
bowgarguide

- TKF 5000 Club

- Posts: 5370
- Joined: Mon Jan 15, 2007 7:52 pm
Re: Brazos River Fishing Rocket: Fillets Almost Done...
Dog paddling
She is looking good,looks like Pogo and Gerald are keeping you straight
Ron
She is looking good,looks like Pogo and Gerald are keeping you straight
Ron
-
Dogpaddlin
- Posts: 874
- Joined: Tue Sep 18, 2007 5:34 pm
- Location: Round Rock
Re: Brazos River Fishing Rocket: Fillets Almost Done...
Just got notification that my fiberglass has arrived. Anybody want to wager on how much sleep I get this weekend  ? I have to spend next week in Virginia so I won't get anything done but a little day dreaming, but then I come back and have a week of vacation .
I don't want you guys to think I could make a post without raising a question, so here it is. Is it necessary or even recommended to do a seal coat on the hull before installing the glass? Does this help to prevent the wood from absorb/drawing the epoxy away from the glass?
I don't want you guys to think I could make a post without raising a question, so here it is. Is it necessary or even recommended to do a seal coat on the hull before installing the glass? Does this help to prevent the wood from absorb/drawing the epoxy away from the glass?
Re: Brazos River Fishing Rocket: Fillets Almost Done...
Seal coats are a much bigger deal in strip building than S&G, particularly when using top quality plywood like your okoume. It's a good idea, but hardly necessary, even with strips. In fact, it's probably best to not even think about it for the first couple boats, then you'll know first hand what the deal with seal coating is. But yes, it is indeed to "help to prevent the wood from absorb/drawing the epoxy away from the glass". You have an excellent hand for this, amigo.
FYI: If you have a bare strip-built hull or deck in front of you, and then paint it over with epoxy (or water), you'll notice right away the rate the wood sponges in the goo is totally uneven. It'll be a mix of shiny and dull splotches. That's because the wood varies in density, what the grain's doing, etc. You could lay on some cloth and wet it out and make it look good, then come back a half hour later to find white spots where the glass is starved .... and that would be because the wood there was hungrier, and soaked up epoxy more ethusiatically -- to the point it sucked the epoxy right out of the cloth. A seal coat neutralizes the pores and makes the surface consistent in this regard. Plywood tends to be less "thirsty" than cedar, and certainly less prone to the sort of random vagary I'm talking about .... and the higher the quality, the less prone yet.
FYI: If you have a bare strip-built hull or deck in front of you, and then paint it over with epoxy (or water), you'll notice right away the rate the wood sponges in the goo is totally uneven. It'll be a mix of shiny and dull splotches. That's because the wood varies in density, what the grain's doing, etc. You could lay on some cloth and wet it out and make it look good, then come back a half hour later to find white spots where the glass is starved .... and that would be because the wood there was hungrier, and soaked up epoxy more ethusiatically -- to the point it sucked the epoxy right out of the cloth. A seal coat neutralizes the pores and makes the surface consistent in this regard. Plywood tends to be less "thirsty" than cedar, and certainly less prone to the sort of random vagary I'm talking about .... and the higher the quality, the less prone yet.
-
gerald
- TKF 4000 Club
- Posts: 4174
- Joined: Thu Jun 12, 2003 10:48 am
- Location: Gatesville, tx www.theoldmansboats.com
Re: Brazos River Fishing Rocket: Fillets Almost Done...
Pogo covered that question well. One other reason I do a precoat (seal coat) is for the final filling of any holes and cracks. With a precoat the wood has changed to it's basic finished color. I can color match the filler material--if I want. I have done many boats without precoats and even now do some parts with no precoat, but I prefer a precoat.